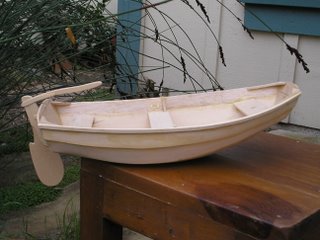
Case closed


My boat is nearing completion! The most difficult aspect of building this model has been to decrypt the instructions, which are frustratingly vague, at least to a blonde. Here's what I've done in the last week:
1. I made the daggerboard case, the case cap, the daggerboard, and the daggerboard cap. The daggerboard, also called a centerboard, is a rudder type thing that sticks down below the center of the boat. It stabilizes the boat for sailing. The daggerboard cap is just a piece of wood on top of the board that holds it in place inside the daggerboard case. The case is the slot through which the daggerboard slides through the bottom of the boat. The case cap is a cover that goes over the case when the daggerboard is not inside it.
Part of this project required cutting a slit in the bottom of the boat, which scared me, but it turned out to be easy.
2. I made the mast step, which is a tiny piece of wood that is placed below the forward seat and into which the mast for the sail sets. The mast step and the forward seat each have a hole in them through which the mast slides and which have to line up. Let's hope I lined them up correctly!
3. I glued the seats in place: forward, middle, and aft. I probably re-cut each seat at least twice because of screw-ups.
4. You should see my cheeks! The rudder and the tiller both have cheeks, very sweet. On the tiller, the cheeks are the extensions that attach to the rudder. On the rudder, the cheeks cover the top half of it and are embraced by the tiller cheeks.
For my next act, I will create three spars: the mast, the yard and the boom. They all connect to the sail, or the sail connects to them. I also have to make the sail. Next I paint the boat, and it's done. The plans include directions on how to build a cradle for the boat, a cradle being a set-up to display the model, but I have an alternate plan. I'm going to moor it in my backyard pond.


0 Comments:
Post a Comment
<< Home